- Full documentation, guide and tutorial
- Learning the Woovebox
- The very basics
- Quick start tutorial
- Tempo and BPM
- Tracks
- Patterns
- Live pattern recording
- Conditional triggering and modification
- Chords
- Arpeggios
- Scales and modes
- Genres
- Patches and Presets
- Sound design
- DNA dynamic patch cross-breeding
- Paraphonic parts
- Multi-instrument mode
- Risers, fallers, sweeps & ear candy
- Live mode
- Song mode
- Full song writing
- Sampler & vocoder
- Mixing & Mastering
- Lo-fi & vintage analog and digital emulation
- Randomization
- Hall effect sensor playing
- Advanced techniques
- Undo
- Boot modes
- Connecting other gear; MIDI, Sync, and audio pass-through
- Remote control expander mode
- Wireless MIDI over Bluetooth
- Connecting Bluetooth typing keyboard/touchpad
- Battery and charging
- Hardware quirks and limitations
- Understanding DSP load
- Looking after your Woovebox
- Firmware updates
- General workflow recommendation
- Mastering compressors
Mastering compressors
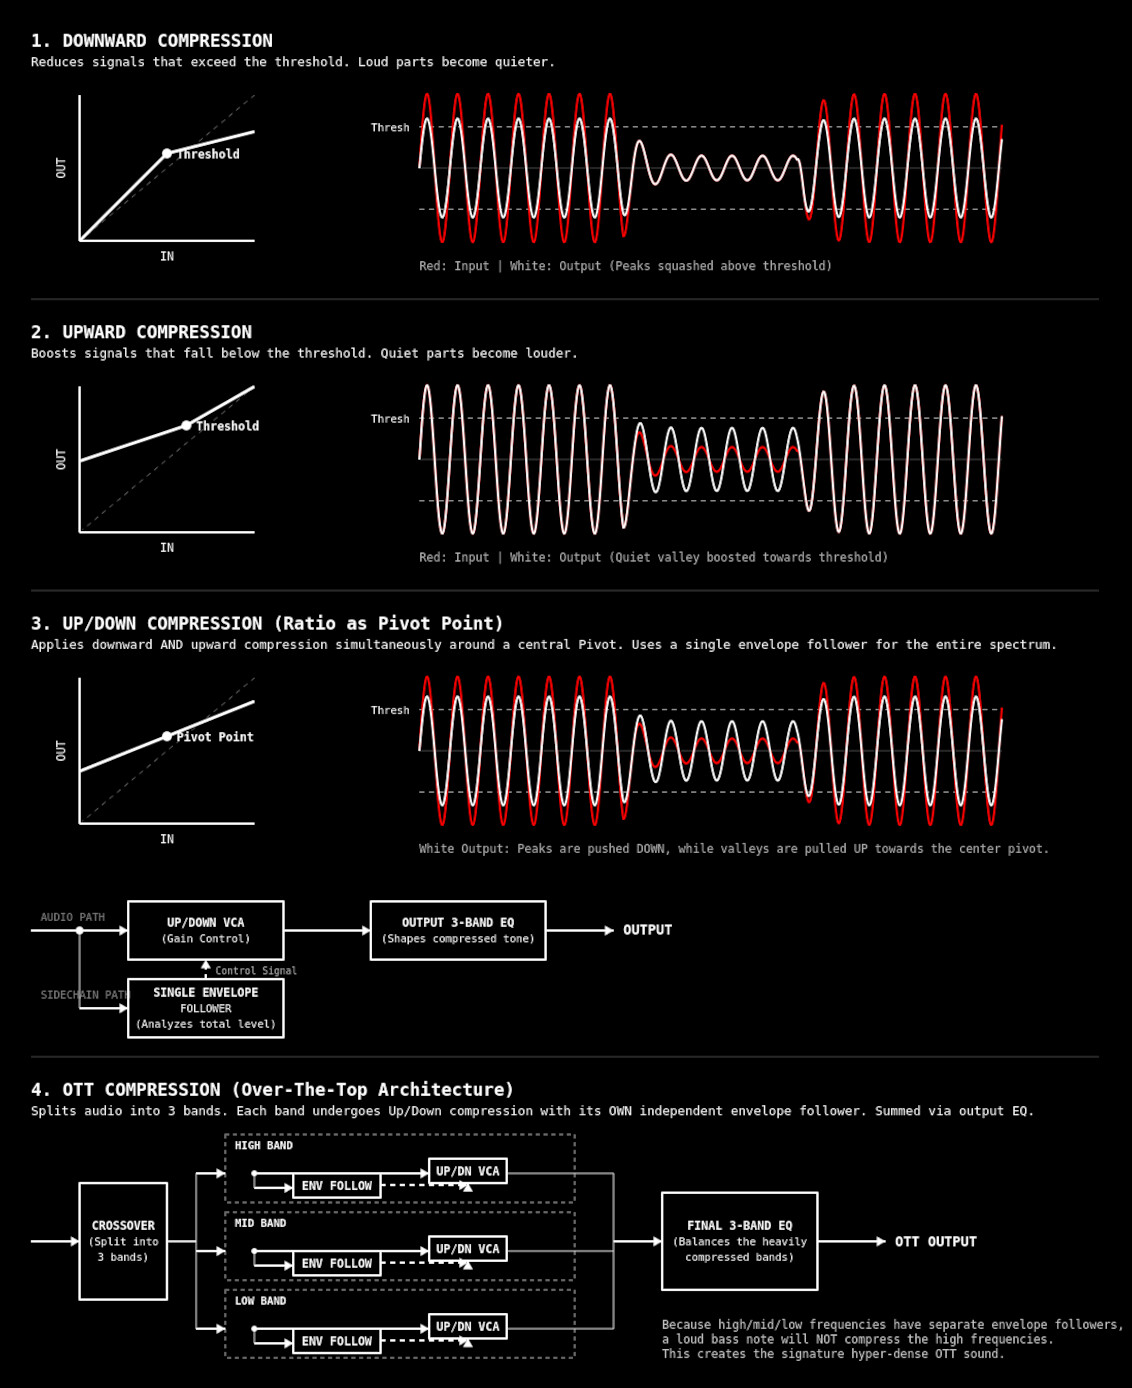
Aside from the per-track up/down compressor for creative use, your Woovebox also comes with a selection of four master compressor types, selectable via 16/A8/MC.ty on the Song's mastering ('MStr') page;
- Downward compression turns down only the parts of a sound that go above a chosen loudness point called the threshold. Think of the threshold (9/A1/MC.th) as a ceiling. If the sound tries to jump above it, the compressor pushes it back down. The ratio (10/A2/MC.rt) controls how hard it pushes. A ratio of 2.00 (2:1) means that for every 2 dB the sound goes above the threshold, only 1 dB is allowed through. Bigger ratios mean stronger squashing. This makes loud peaks less wild and helps the whole sound feel more controlled. Downward compression's best use cases are for taming loud transients, controlling aggressive peaks, and traditional dynamic range reduction.
- Upward compression does the opposite. Instead of pushing loud sounds down, it pulls quiet sounds up. The threshold becomes more like a floor. Sounds below it get boosted, while loud sounds stay mostly unchanged. The ratio still acts like a pivot rule around the threshold, deciding how strongly quiet sounds are lifted. This makes details easier to hear and can make recordings feel fuller or more "in your face". Its best use cases are for raising the floor of a mix, bringing out quiet reverb tails, breath noises, or subtle background elements without squashing peaks.
- Up/down compression combines both ideas around the same pivot point. Sounds above the threshold are pushed downward, while sounds below it are pulled upward. The ratio decides how strongly things move toward the center from both directions. Imagine squeezing a sponge from the top and bottom at the same time so everything becomes more even. This creates a dense, balanced sound where quiet details are clearer and loud parts are less extreme. Its best use case is for maximizing perceived loudness and creating a dense, heavily controlled, "brick-wall" style dynamic consistency.
- OTT compression is an aggressive form of multiband up/down compression often used in electronic music. "OTT" originally meant "over the top", because the effect is intentionally extreme. The sound is strongly split into three frequency bands, and each band gets strong upward and downward compression around the threshold and ratio pivot point. Quiet details get heavily boosted while loud peaks get tightly controlled, creating a bright, dense, hyper-detailed sound that can make synths and drums feel huge and energetic.
The up/down compressor variant is a great all-rounder. Hyper-energetic genres like EDM/IDM, Jungle, DnB etc. may benefit from the OTT compressor, particularly if in cases where deep basses or pumping kicks are very prevalent. Please not that it is easy to "over do" aggressive compression, particularly with OTT compression. Be careful not to fatigue your listener. To help with the latter, you will have noticed that all four compressors are fully parametric, rather than being a one-knob preset affair, so you can dial in the precise settings that works for your mix.
Attack and release
Attack (11/A3/MC.At) and release (12/A4/MC.rL) are the “fade-in” and “fade-out” speeds of the gain change itself. Attack dictates how quickly the compressor reaches full action after audio crosses the threshold; release dictates how quickly it backs off once audio returns past the threshold.
In downward compression, attack determines how much of a loud transient "escapes" before attenuation kicks in: fast attack clamps peaks immediately and sounds tighter/smoother, while slow attack lets the transient punch through before the gain reduction catches up. Release determines how long the signal stays attenuated afterward: short release recovers quickly and can sound energetic or pumpy, long release sounds smoother but can flatten dynamics.
In upward compression, the exact same timing behavior applies to boost instead of attenuation. Fast attack quickly raises quiet material as soon as it falls below threshold, making low-level detail and ambience jump forward immediately; slow attack delays that lift, so quiet tails emerge more gradually. Release controls how long the boost remains after the signal rises again: short release drops the boost quickly and sounds cleaner/more obvious, while long release lets the lifted ambience or sustain linger, often sounding denser or more "glued".
The key perceptual difference is that downward timing shapes the front edge and recovery of loud events, while upward timing shapes the emergence and decay of quiet material.
Note that the quintessential OTT compression sound typically has an very fast attack, and a fast-to-medium release. In general, you may find that songs require different attack and release settings, depending on tempo and rhythmic content.
3-band mid, high low and implementation details
The chosen mastering compressor operates on three bands, giving you precise control over three separate mastering-relevant frequency bands.
- The OTT compressor has a seperate envelope follower for each of the three separate bands, whereas the up, down and up/down compressors only have a single envelope follower for the aggregate signal.
- The up, down and up/down compressor's single envelope follower has an anti-pumping bass filter that progressively attenuates frequencies below 220Hz, so that heavy bass notes will not trigger the compressor as easily as mid-range or high-frequency transients.
- The up, down and up/down compressor implements dual-speed envelope tracking, ensuring lightning-fast attack times for catching stray transients, but natural, smooth release times that don't flutter or distort lower frequencies.
- The OTT compressor bands comprise roughly 170Hz and lower for the lows, 220Hz - 2500Hz for the mids, and 2500Hz+ for the highs. The bands are strongly isolated.
- The up, down and up/down compression algorithm's bands are intentionally less strongly isolated than the OTT bands. The low band captures all the low and lower-mid frequencies and rolls-off as it approaches 1750Hz, the mid-band peaks exactly at 1750Hz and responds in a bell curve centered around 1750Hz, while the high band captures everything above 1750Hz in the upper-midrange, isolating the treble and "air."
On the Song's mastering ('MStr') page, use 13/A5/MC.Lo, 14/A6/MC.Md and 15/A7/MC.Hi to control the compressor's effect on the low, mid and high frequencies respectively. Note that it is possible to "oversteer" the result by 200% if required, though some care must be taken to not run into clipping issues.
Monitoring and making changes in real-time during playback
To play back your song while making changes to your Song's FX or Mastering page, hold any available 1-16 parameter on the Song's FX or Mastering page and then press play. Your song will start playing from the fragment you last started playback from, however will remain on the Song's FX or Mastering page, without the interface cycling through the fragments as would normally be the case.
Though generally lenient, ideally you should make small changes and monitor the entirety of your song to ensure your settings work for the entire mix. Use conservative ratios (10/A2/MC.rt), unless you have a special use case, sound or genre you are targeting.
You may also be interested in...
- 16. MC.ty Master Compressor Type (under MStr (mastering))
- Randomizing a patch (under Randomization)
If your track's sound category is a bass, the patch generator will generate a random bass patch.
- Putting it all together: making your song "radio-ready" (under General workflow recommendation)
Re-listen to your song to confirm it still sounds good and appropriate on all other systems.
- Full preset list (under Patches and Presets)
saw stab; pure saw patch, good starting point for sound design.
- Program a bassline (under Quick start tutorial)
You may also notice the chord track faintly playing in the background every time you hit a bass note on the 1-16 keys.
- Full documentation, guide and tutorial
- Learning the Woovebox
- The very basics
- Quick start tutorial
- Tempo and BPM
- Tracks
- Patterns
- Live pattern recording
- Conditional triggering and modification
- Chords
- Arpeggios
- Scales and modes
- Genres
- Patches and Presets
- Sound design
- DNA dynamic patch cross-breeding
- Paraphonic parts
- Multi-instrument mode
- Risers, fallers, sweeps & ear candy
- Live mode
- Song mode
- Full song writing
- Sampler & vocoder
- Mixing & Mastering
- Lo-fi & vintage analog and digital emulation
- Randomization
- Hall effect sensor playing
- Advanced techniques
- Undo
- Boot modes
- Connecting other gear; MIDI, Sync, and audio pass-through
- Remote control expander mode
- Wireless MIDI over Bluetooth
- Connecting Bluetooth typing keyboard/touchpad
- Battery and charging
- Hardware quirks and limitations
- Understanding DSP load
- Looking after your Woovebox
- Firmware updates