- Full documentation, guide and tutorial
- Learning the Woovebox
- The very basics
- Quick start tutorial
- Tempo and BPM
- Tracks
- Patterns
- Live pattern recording
- Conditional triggering and modification
- Chords
- Arpeggios
- Scales and modes
- Genres
- Patches and Presets
- Sound design
- DNA dynamic patch cross-breeding
- Paraphonic parts
- Multi-instrument mode
- Risers, fallers, sweeps & ear candy
- Live mode
- Song mode
- Full song writing
- Sampler & vocoder
- Mixing & Mastering
- Lo-fi & vintage analog and digital emulation
- Randomization
- Hall effect sensor playing
- Advanced techniques
- Undo
- Boot modes
- Connecting other gear; MIDI, Sync, and audio pass-through
- Remote control expander mode
- Wireless MIDI over Bluetooth
- Connecting Bluetooth typing keyboard/touchpad
- Battery and charging
- Hardware quirks and limitations
- Understanding DSP load
- Looking after your Woovebox
- Firmware updates
- Mixing & Mastering
- General workflow recommendation
General workflow recommendation
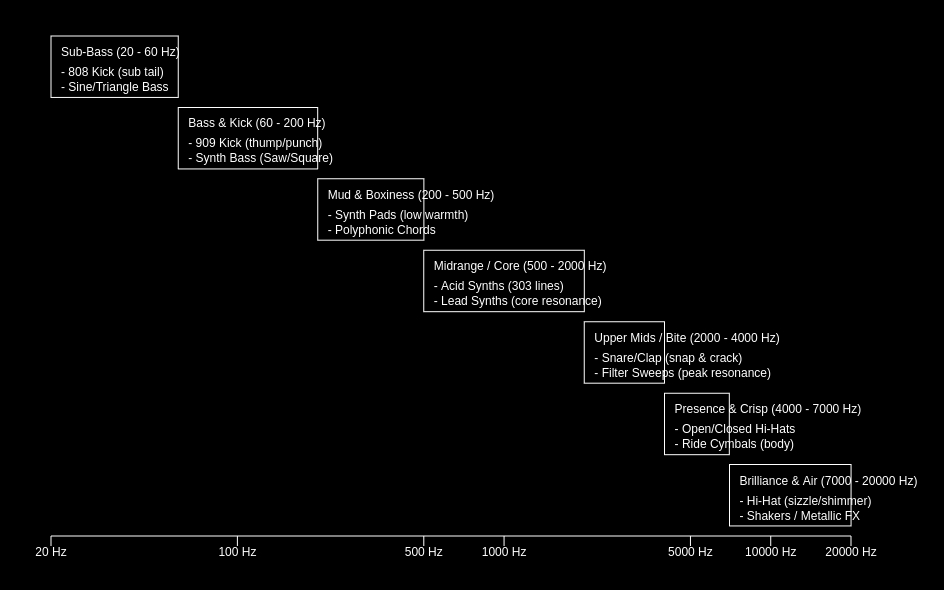
Composing your song, learn to keep a mental note of the different frequencies you are using and targeting.
Make a mental note of any tracks you know may occupy the same frequencies. For example, in some genres, it is common to have a bassline + another "driving" bass (often just repeating the same note rapidly) to add energy or drive. These two elements would obviously compete for the same frequencies, but they have different goals. One is oriented towards conveying a bass hook or melody, while the other is just there to convey energy/urgency/drive/rhythm. Once it is time to perform mastering of your song, you should probably opt to remove/attenuate the driving bass' fundamental (use a high pass EQ or "missing fundamental" technique), retaining the suggestion/rhythm of the driving bass, however leaving the fundamental free for the actual (more important) bassline.
Another example is your lead and some backing chords - perhaps some pads or strings. These tend to occupy the same frequency range. When it comes to mixing, you could, for example consider using side chaining to duck the chords a little whenever the lead is playing. A more crude (though usually effective) method would be to perform a mid/low cut using the parametric EQs around 440Hz. "Crude" because this would affect your chords throughout the entire song, rather than just "sometimes" while the lead is playing.
Side chaining
In general, the effectiveness of side chaining cannot be overstated. The idea is that you don't have to worry about clashing frequencies to begin with, if you can simply make sure that the clash doesn't happen in the first place. That's because one of the potentially competing elements is simply (temporarily) not playing. It is a very effective way of creating clarity in your mix.
For example, to side chain your chord track to your lead so that the chord track "falls away" whenever your lead is playing;
- On the dynamics (dyna) page of the lead track; set 2/bS/S.bus/Send Bus to 2, and make sure 3/Ld/S.Src/Signal Source is set to Audio ('Audi'). Now your lead's audio is sent to bus 2, so any track that is "subscribed" to bus 2 can receive it. Note that you can also send other signal sources from the track, depending on what you need other tracks to react to.
- On the dynamics (dyna) page of the chord track; set 1/Cd/r.bus/Receive Bus to 2 (you may also receive from more buses than just bus 2 at the same time), and make sure 5/Ki/Sd.dp/Side Depth is cranked up to start hearing the effect. Note that 7/hh/Sd.At/Side Attack and 8/Pc/Sd.RL/Side Release allow you to specify how quickly the volume should duck and come back again.
In the same way you can create that familiar "pumping" effect in response to a kick; just send the kick's audio (or some other signal, like its oscillator volumes) to a bus and have anything you'd like to get "pumped" subscribe to that bus. It's a classic way to bring out the kick and making sure it doesn't get lost in your mix.
Pre-send FX high-pass filter
If you use delays or reverb on your lead and find the effects cause your lead to disappear in "mud" due to the reverb/delay signal competing with the lead itself, then consider engaging the pre-FX high pass filter (7/hh/Ef.HP on the Pan+EQ/PnEQ page of a track). This way any reverb or delay will not compete with the lead, but will still provide the suggestion of space, delay and reverb (just in the higher frequencies - clear of the frequencies the lead occupies).
Local and global FX ducking
If you don't want to use pre-filtering of the effects send, you can alternatively have a track duck its own send effects level by using the 14/A6/rv.dU/Reverb Ducking or 15/A7/dL.dU/Delay Ducking setting on the dyna page of a track. This can also be used for creative effects where slowly decaying instrument tail gradually washes out as it decays in volume.
If you find elements are getting lost due to some other element's use of FX, use the global effects ducking setting (13/A5/Gb.du/Global Ducking on a track's dyna page). This temporarily make the FX less audible while your element is playing. This technique can be quite useful for bringing a lead to the fore.
Ducking uses a track's compressor attack (11/A3/Cm.At) and release (11/A3/Cm.rL) settings for its audio envelope follower.
Genre-based sub-bass decisions
If you genre calls for a strong sub-bass, be aware that not all sound reproducing devices can replicate such low frequencies. In such cases, you must decide whether you are happy to not have a sub-bass at all on such devices (for example as seen in old school dub step), or whether you would like to at least provide a "hint" of something happening.
Stereo widening and bass monofying
Stereo widening makes a mix feel bigger by increasing the difference between the left and right channels, which spreads sounds outward and creates a wider sense of space. Bass monofying does the opposite for low frequencies: it forces the bass into mono so both speakers reproduce the same low-end signal, keeping kicks and basslines tight, centered, and phase-safe. Together, these techniques help mixes feel wide and immersive on top, while keeping the low end solid, punchy, and reliable across speakers, headphones, clubs, and vinyl systems.
On the Song's 'MStr' (mastering) page, use 1/Cd/WidE 'Stereo Widening' set the high frequency stereo width to a percentage (0-400) of the input signal. Use 2/bs/Mono 'Bass Monofy' to select a frequency below which audio content is pulled towards the center of the stereo field.
Slap delay and ADT-style widening and emphasis
Slap delay and ADT-style (Artificial Double Tracking) widening can be achieved per-track by configuring one of the delays with a very short delay time. For your convenience, this is the default setup for Delay 2 when a song is initialized.
It useful for increasing presence of drums (such as snares and kicks) as well as making other parts sound fuller or "in your face". If panning is "left and right", this technique can turn one of the delay sends into "back and front". See also the delay documentation in the sound design section for more details on this technique.
Equalization (EQ-ing)
Per-track EQing (on a track's Pan/EQ/'PnEQ' page) gives each instrument or voice its own “tone shaping” so everything fits together without fighting for the same frequency space. Imagine a big group conversation: if everyone talks in the same pitch and volume, it becomes muddy. EQ (equalization) is like asking one person to speak a little deeper, another a little softer, and another a little brighter so you can understand everyone clearly.
In music mixing, every sound lives in certain frequency ranges. A kick drum and bass guitar both use lots of low frequencies, so they can clash and sound boomy. A singer and guitar may compete in the mids, making vocals hard to hear. Per-track EQing lets you boost frequencies that help a sound stand out and cut frequencies that are unnecessary or conflicting. For example, you might remove low frequency rumble from vocals, or add brightness to cymbals.
The goal is not to make each track sound amazing or "loud" by itself - it’s to make the whole mix sound clear together. A guitar that sounds thin alone might fit perfectly once drums, bass, and vocals are added. EQ is less about “making things louder” and more about carving out little spaces so every sound has room to breathe.
Specifically, the Woovebox gives you a 3-band parametric EQ, which allows you to 6db cut, keep or 6db boost a track's low (1/Cd/EQ.Lo) and/or mid (2/bS/EQ.Md) and/or high (3/Ld/EQ.Hi) frequencies. The "parametric" part comes in the form of a configurable pivot mid frequency (4/Ar/EQ.Fr).
For example, specifying a mid frequency (4/Ar/EQ.Fr) of 440Hz, mid frequencies (modified by 2/bS/EQ.Md) "live" around 440Hz, while anything around 220Hz (440Hz halved) and lower would be considered low frequencies (modified by 1/Cd/EQ.Lo), and anything around 880Hz (440Hz doubled) and higher would be considered high frequencies (modified by 3/Ld/EQ.Hi).
The gain relationships between the three bands are clean and predictable; if you instinctively deduced that boosting all three bands simultaneously simply makes the 6db signal louder, you would be correct. Similarly cutting all bands makes the signal 6db softer.
EQ-ing as a (low) priority when mixing on the Woovebox
In Woovebox world, EQ-ing is considered a "blunt" tool, in that it changes a signal's frequency response "forever" throughout your song. It is all well and good to remove frequencies from your lead that may clash with the chords, but if the chords aren't playing in a section of your song, this may leave your lead sounding unnecessarily thin.
Your Woovebox provides you with more advanced tools (chiefly the side chaining, FX ducking and compressors) that allow you to work "temporally", meaning that you can change when something should be audible in your mix, depending on what else is going on.
Therefore, on the Woovebox, you are encouraged to only use per track EQ-ing as a "last resort" fix, only to be used if you cannot achieve a satisfactory result using sound design, sidechaining and/or compression alone.
Aural Exciter mode
A classic aural exciter is like a "detail highlighter" for sound; instead of just boosting the high frequencies, it creates tiny new harmonics (extra high-frequency content) that can make audio seem clearer, brighter, and more alive without needing a huge volume boost. When used effectively, vocal samples may sound crisper, leads may sparkle more, and total mixes may feel more "present".
Conceptually, when the exciter is enabled (8/Pc/'Aura'), an absolute value is applied to the mid and/or high bands before they are mixed into the output of the EQ. Full-wave rectification (absolute value) of a band signal creates even-order harmonic distortion (primarily 2nd harmonic) concentrated in that frequency region. This has three consequences for the affected band:
- The original fundamental is removed from the band signal
- A DC offset is introduced (amplitude at 0.637 x the original peak)
- Even-order harmonics are generated; primarily the 2nd harmonic (one octave up, amplitude at 0.424 x), then the 4th, 6th, etc. with rapidly decreasing amplitude.
The perceptual result is a brightening and fattening of the affected frequency region with strong octave-doubling character, similar to a classic analogue harmonic exciter or soft fuzz.
The Woovebox implementation goes a bit further by applying it to not just the highs but also the mids, while also applying it for an EQ cut and not only boosts. This provides new interesting ways of harmonic distortion and tone shaping. Note that, if engaged, only the mid and/or high bands are processed. The low band is intentionally excluded. Rectifying bass frequencies would produce strong DC offset and sub-harmonic beating, which is generally destructive in audio contexts.
Summary of EQ with exciter tonal character (low band setting is ignored);
- Only high boost; Exciter Octave-up air and presence (classic exciter sound)
- Only mid boost; Mid-range harmonic enrichment with octave doubling
- Only high cut; Attenuated, phase-coherence-broken high end; unusual tonal character
- Only mid cut; Attenuated, hollowed, granular mid scoop; unusual tonal character
- Mid and high boost; full-spectrum fuzz at +6 dB
- Mid and high cut; full-spectrum fuzz at -6 dB
Harmonics
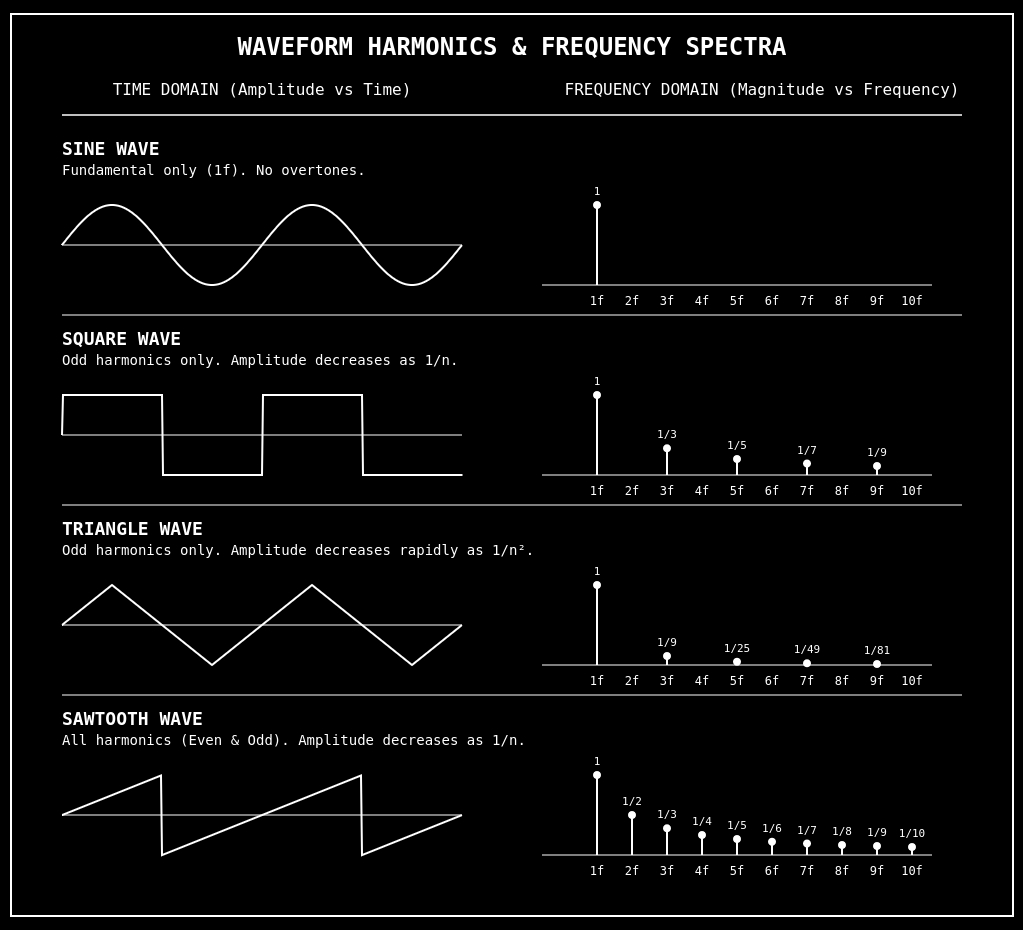
As most musicians know, a waveform is the shape of a vibration over time. The main vibration is called the fundamental, and it determines the basic pitch or frequency you hear.
Harmonics are extra vibrations riding on top of the main one at higher frequencies that are usually simple multiples of the fundamental. Even though they are quieter, they change the shape of the waveform and give the sound its unique character.
That is why different instruments can play the same musical note but still sound different. For example, a flute has fewer strong harmonics, so it sounds "smooth", while a distorted guitar has many strong harmonics, so it sounds bright and buzzy. Harmonics are basically the “extra ingredients” that color a sound or signal.
When mixing, this important knowledge can help you diagnose and clean up your mix. It, for example, explains why two saw waves are harder to mix - they "exist" all over the spectrum due to their harmonics. They contribute to "mud" way quicker. If you ever tried to mix a super saw (7 saws at once), you will know all about this.
Similarly, it also explains why sine waves are much easier to mix - the only harmonic is the fundamental at the exact frequency you play its note. It is therefore not a coincidence that the Woovebox' 3rd oscillator is a sine wave, as a sine wave can be surgically inserted to "beef up" a sound or fill a specific frequency without overpowering or affecting any of the other frequencies.
Of course, not all sounds are "neat" sines, squares, saws or triangles, with neatly isolated fundamentals but this should give you an idea of how sounds are built and how they occupy frequencies.
"The missing fundamental"
There is a neat psycho-accoustic trick/phenomenon called "the missing" fundamental. I turns out that you can create the suggestion of a sound by playing its harmonics but leaving out its fundamental. This trick is closely related to how bass frequencies can seemingly be played on tiny laptop speakers.
Producers of genres that rely on deep kicks and sub-bass should take note here. This trick provides a way to at least convey the "suggestion" of something happening at a frequency that a small speaker cannot reproduce.
On the Woovebox, the third oscillator (sine wave) can be configured to have its phase inverted so that when it is played together with, for example, a saw wave, the saw wave's fundamental is prefectly cancelled out by the inverted sinewave, recreating the "missing fundamental" effect.
Transients
A transient is the very first burst of a sound - the quick "snap", "click" or "thump" at the beginning. When a musician hits a drum, claps their hands, or plucks a guitar string, the sharp attack you hear right away is the transient. It usually lasts only a tiny fraction of a second, but your brain uses it to recognize what made the sound and how hard it was played.
Transient shaping is changing that attack without changing the whole sound too much. Turning the transient up makes sounds feel punchier and more energetic, like a drum hitting harder. Turning it down makes sounds softer and smoother, like moving a drummer farther away or wrapping the drum in cloth. Transient shaping then, allows you to control how aggressive, sharp, or gentle sounds feel in your song.
Besides the regular envelope generators for amplitude and filter, there are two main ways to shape the transients on a track;
- Using the third oscillator in "click" mode; the third oscillator's sine wave starts at a 90 degree phase, meaning that the waveform starts at full amplitude. This causes a "click" (due to the speaker being pulled immediately to "max volume" rather than ramping up with / riding the start of the sine wave). This simple track can add punch to kicks and other percussion, as well as regular synthesised instruments.
- Using the track's compessor in downward compression mode (with fast attack and very low threshold); this causes a track's sound to start off normally, then sharply reduce the volume of the anything that follows. This creates a comparatively louder transient than the rest of the sound.
If your sound uses reverb, be sure to dial in a suitable reverb pre-delay (15/A7/rv.P.d on the Song's FX page) that gives your sound time to play its transient before its reverb signal starts blending in and - potentially - obscuring/"drowning" the sound.
Mastering compressors
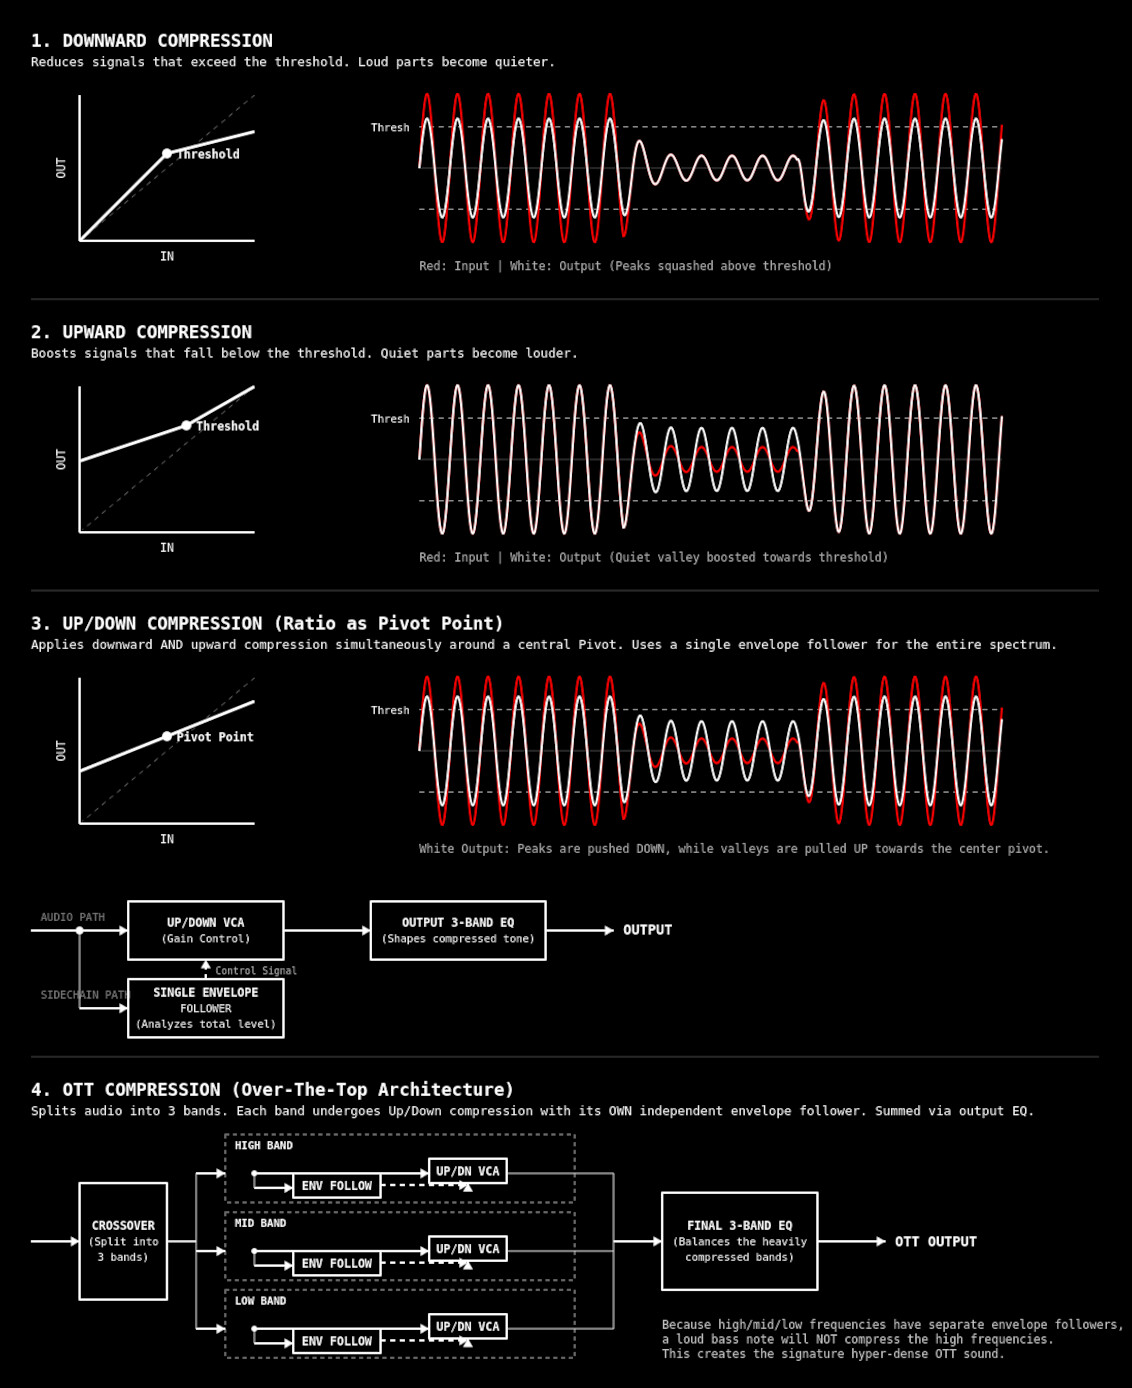
Aside from the per-track up/down compressor for creative use, your Woovebox also comes with a selection of four master compressor types, selectable via 16/A8/MC.ty on the Song's mastering ('MStr') page;
- Downward compression turns down only the parts of a sound that go above a chosen loudness point called the threshold. Think of the threshold (9/A1/MC.th) as a ceiling. If the sound tries to jump above it, the compressor pushes it back down. The ratio (10/A2/MC.rt) controls how hard it pushes. A ratio of 2.00 (2:1) means that for every 2 dB the sound goes above the threshold, only 1 dB is allowed through. Bigger ratios mean stronger squashing. This makes loud peaks less wild and helps the whole sound feel more controlled. Downward compression's best use cases are for taming loud transients, controlling aggressive peaks, and traditional dynamic range reduction.
- Upward compression does the opposite. Instead of pushing loud sounds down, it pulls quiet sounds up. The threshold becomes more like a floor. Sounds below it get boosted, while loud sounds stay mostly unchanged. The ratio still acts like a pivot rule around the threshold, deciding how strongly quiet sounds are lifted. This makes details easier to hear and can make recordings feel fuller or more "in your face". Its best use cases are for raising the floor of a mix, bringing out quiet reverb tails, breath noises, or subtle background elements without squashing peaks.
- Up/down compression combines both ideas around the same pivot point. Sounds above the threshold are pushed downward, while sounds below it are pulled upward. The ratio decides how strongly things move toward the center from both directions. Imagine squeezing a sponge from the top and bottom at the same time so everything becomes more even. This creates a dense, balanced sound where quiet details are clearer and loud parts are less extreme. Its best use case is for maximizing perceived loudness and creating a dense, heavily controlled, "brick-wall" style dynamic consistency.
- OTT compression is an aggressive form of multiband up/down compression often used in electronic music. "OTT" originally meant "over the top", because the effect is intentionally extreme. The sound is strongly split into three frequency bands, and each band gets strong upward and downward compression around the threshold and ratio pivot point. Quiet details get heavily boosted while loud peaks get tightly controlled, creating a bright, dense, hyper-detailed sound that can make synths and drums feel huge and energetic.
The up/down compressor variant is a great all-rounder. Hyper-energetic genres like EDM/IDM, Jungle, DnB etc. may benefit from the OTT compressor, particularly if in cases where deep basses or pumping kicks are very prevalent. Please not that it is easy to "over do" aggressive compression, particularly with OTT compression. Be careful not to fatigue your listener. To help with the latter, you will have noticed that all four compressors are fully parametric, rather than being a one-knob preset affair, so you can dial in the precise settings that works for your mix.
Attack and release
Attack (11/A3/MC.At) and release (12/A4/MC.rL) are the “fade-in” and “fade-out” speeds of the gain change itself. Attack dictates how quickly the compressor reaches full action after audio crosses the threshold; release dictates how quickly it backs off once audio returns past the threshold.
In downward compression, attack determines how much of a loud transient "escapes" before attenuation kicks in: fast attack clamps peaks immediately and sounds tighter/smoother, while slow attack lets the transient punch through before the gain reduction catches up. Release determines how long the signal stays attenuated afterward: short release recovers quickly and can sound energetic or pumpy, long release sounds smoother but can flatten dynamics.
In upward compression, the exact same timing behavior applies to boost instead of attenuation. Fast attack quickly raises quiet material as soon as it falls below threshold, making low-level detail and ambience jump forward immediately; slow attack delays that lift, so quiet tails emerge more gradually. Release controls how long the boost remains after the signal rises again: short release drops the boost quickly and sounds cleaner/more obvious, while long release lets the lifted ambience or sustain linger, often sounding denser or more "glued".
The key perceptual difference is that downward timing shapes the front edge and recovery of loud events, while upward timing shapes the emergence and decay of quiet material.
Note that the quintessential OTT compression sound typically has an very fast attack, and a fast-to-medium release. In general, you may find that songs require different attack and release settings, depending on tempo and rhythmic content.
3-band mid, high low and implementation details
The chosen mastering compressor operates on three bands, giving you precise control over three separate mastering-relevant frequency bands.
- The OTT compressor has a seperate envelope follower for each of the three separate bands, whereas the up, down and up/down compressors only have a single envelope follower for the aggregate signal.
- The up, down and up/down compressor's single envelope follower has an anti-pumping bass filter that progressively attenuates frequencies below 220Hz, so that heavy bass notes will not trigger the compressor as easily as mid-range or high-frequency transients.
- The up, down and up/down compressor implements dual-speed envelope tracking, ensuring lightning-fast attack times for catching stray transients, but natural, smooth release times that don't flutter or distort lower frequencies.
- The OTT compressor bands comprise roughly 170Hz and lower for the lows, 220Hz - 2500Hz for the mids, and 2500Hz+ for the highs. The bands are strongly isolated.
- The up, down and up/down compression algorithm's bands are intentionally less strongly isolated than the OTT bands. The low band captures all the low and lower-mid frequencies and rolls-off as it approaches 1750Hz, the mid-band peaks exactly at 1750Hz and responds in a bell curve centered around 1750Hz, while the high band captures everything above 1750Hz in the upper-midrange, isolating the treble and "air."
On the Song's mastering ('MStr') page, use 13/A5/MC.Lo, 14/A6/MC.Md and 15/A7/MC.Hi to control the compressor's effect on the low, mid and high frequencies respectively. Note that it is possible to "oversteer" the result by 200% if required, though some care must be taken to not run into clipping issues.
Monitoring and making changes in real-time during playback
To play back your song while making changes to your Song's FX or Mastering page, hold any available 1-16 parameter on the Song's FX or Mastering page and then press play. Your song will start playing from the fragment you last started playback from, however will remain on the Song's FX or Mastering page, without the interface cycling through the fragments as would normally be the case.
Though generally lenient, ideally you should make small changes and monitor the entirety of your song to ensure your settings work for the entire mix. Use conservative ratios (10/A2/MC.rt), unless you have a special use case, sound or genre you are targeting.
Putting it all together: making your song "radio-ready"
In the context of the previously discussed concepts and tools, making your song "radio ready", means making your songs sound "good enough" on anything that can conceivably play it back.
Picture your song being played back on a transistor radio on a work site, on a cheap laptop with tinny speakers, in a car with exaggerated bass, on a high-end audio system with sub woofer, or on a poorly calibrated home theater system set to enhance voice dialog.
Each of these systems have their quirks, gaps, limitations or exaggerations when it comes to reproducing the full audible spectrum. For example, physics dictates that small speakers - as found in the transistor radio or the cheap laptop - will never be able to reproduce deep bass (and if someone tells you otherwise, you are being lied/marketed to).
Making your song sound "good enough" on all these devices, means that people listening through them can still discern all the important elements in your song, no matter the spectrum reproduction limitations of the device. That does not necessarily mean those elements will sound the same however; we are merely talking about the suggestion of their presence. The primary goal is for the musical information (e.g. your full composition/arrangement) to survive.
Before doing all this, however, ensure you have already used basic the side-chaining, ducking and FX mud avoidance outlined previously, to ensure your elements are getting the right attention in the mix at the right time ("temporal mixing"). When doing this, use a device you trust to give you a reasonable flat frequency response (e.g. good monitoring headphones or speakers that accurately represent every frequency equally). This makes your life a lot easier when your start to trouble shoot for specific devices, on your way to a "radio ready" mix.
Making your song sound "good enough" on all these devices, means that people listening through them can still discern all the important elements in your song, no matter the spectrum reproduction limitations of the device.
E.g. free up the spectrum as much as possible first, based on what's playing in your song ("temporal mixing"), and only then start troubleshooting any elements that sound too loud or not loud enough on other devices.
Again, we note that the most expensive and "perfect" monitoring solution with a flat frequency response is still not a good indicator on how your song will be perceived on other devices. For example, a pure sine wave bass that sounds perfectly fine in your "perfect" monitoring solution, will fail to render completely on at least some devices in the real world.
"Suggestion" over actual presence
As touched upon discussing the "missing fundamental" techniques, the human brain is exceptionally good at filling in the blanks, as long as it has something to go by (for example a transient or higher harmonics). It is your job then to help the brain as much as possible using the tools and concepts discussed earlier.
Concretely, this means that - unless your genre specifically calls for, say, a strong sub-bass - you will want to avoid the situation where an element occupies just a single frequency in the audio spectrum (like the aforementioned sine wave); in such a case it is possible/likely to completely disappear or drowned out on at least some of these devices.
- Listen and re-listen on as many devices as you can. Have a set of devices ready that you know well, and that you know have specific flaws that are representative of real-world situations (the tinny laptop speakers, the exaggerated bass car stereo, the missing mids of a poorly calibrated home theater system, etc.).
- Make sure you can hear all your song's elements at least happening(!) on each and everyone of these systems.
- If you cannot hear certain elements, use the tools at your disposal to make them stand out more. For example, shaping their transients (using the per-track compressor, adding a slight click or noise burst, etc.), or adding harmonics (open a low-pass filter slightly more, use a saw or square wave instead of a sine, use the aural exciter, use an EQ boost, etc.) or more strongly ducking other elements out of the way that may be overpowering the harmonics on that specific device (or as a last resort, use a permanent EQ cut for those competing elements if you really have to).
- Re-listen to your song to confirm it still sounds good and appropriate on all other systems
- Go to 1.
By the end of this process, you will have a track that conveys your song with all its elements across almost all possible playback devices; it will have become "radio-ready".
You may also be interested in...
- "Eternal Happiness" song SYX (under Download 3.0 example songs and patches .SYX)
Mid/side master processing (stereo widening, bass monofying).
- Song Mode (under Cheat sheet)
See "Use Live scene (mutes/unmutes/solos) in Sequencer / Track Edit mode" Edit track Cd-A8 behavior for song fragment.
- Intermediates (under How to approach)
(crucial to get to the core of the Woovebox) understanding how tracks and their patterns are used in a Song mode via fragments.
- Beginners (under How to approach)
understanding how to create a simple 16-step pattern across multiple tracks (for example, some chords, a bass, and a kick).
- Spectral resolution optimizer (under Understanding DSP load)
'FuLL'; forces full spectral resolution allocation for the track, preventing loss of resolution at all times.
- Full documentation, guide and tutorial
- Learning the Woovebox
- The very basics
- Quick start tutorial
- Tempo and BPM
- Tracks
- Patterns
- Live pattern recording
- Conditional triggering and modification
- Chords
- Arpeggios
- Scales and modes
- Genres
- Patches and Presets
- Sound design
- DNA dynamic patch cross-breeding
- Paraphonic parts
- Multi-instrument mode
- Risers, fallers, sweeps & ear candy
- Live mode
- Song mode
- Full song writing
- Sampler & vocoder
- Mixing & Mastering
- Lo-fi & vintage analog and digital emulation
- Randomization
- Hall effect sensor playing
- Advanced techniques
- Undo
- Boot modes
- Connecting other gear; MIDI, Sync, and audio pass-through
- Remote control expander mode
- Wireless MIDI over Bluetooth
- Connecting Bluetooth typing keyboard/touchpad
- Battery and charging
- Hardware quirks and limitations
- Understanding DSP load
- Looking after your Woovebox
- Firmware updates